Finally, I have finished my Character TD reel! What do you guys think?
Note: I suggest you watch it in HD (720) because pixels.
-K
Sunday, October 14, 2012
Sunday, October 7, 2012
Unity RTS Grid (1.1) {
Labels:
C#,
Game,
Programming,
RTS Grid,
Unity
I've made some improvements to my Unity RTS Grid System. For starters, no more brick boxes and spheres! Here's a list of the significant changes since the last post.
Change Log (1.1):
-K
Change Log (1.1):
- Integrated Unity Navigation for unit pathing
- Modified Grid System to be independent of models/shaders
- Added fast rectangle marquee selection system (No Ray-tracing)
- Added temporary artwork (So my eyes stop bleeding)
- Created R-Tree system (WIP)
And here's a video demonstrating the selection system and Navigation integration:
A note on the Navigation. The building is also a NavMesh, since they will be dynamically added. Currently NavMeshes apparently can push each other around. This is a bug I am going to fix, not a strange design choice.
First thing that came to mind is unprojecting the unit's position from world-space to screen-space. Then simply checking whether the new point was within my rectangle would determine if it is selected. This only works for the single point of the unit's pivot, meaning my rectangle could intersect with most of the model without selecting it. So I simply added a radius and made it a circle. The circle is then tested for intersection with the selection rectangle and more accurate, if still approximate, selection is determined.
There are a few shortcomings with my system, however. Firstly, circles by no means accurately express all models' shapes. Also, my method [currently] doesn't take into account perspective. That is, the circles don't scale with distance from the camera. I have a solution to this but I am unsure if it is necessary or fast enough to be worth it, since my RTS camera may not create much perspective anyways. I'll just save that for another update.
This will be used to sub-group units and items into proximity based bounding rectangles (R for Rectangle). The R-Tree will allow for fast look-up of units based on position. So, for instance, when calculating precise line-of-sight, I only want to check units close to a given unit for efficiency. This allows me to quickly obtain these units.
I am not quite happy with the amount of overlap in the tree at the moment, so I will be working to minimize overlap and area of rectangle groups when I integrate it into the Grid system.
I'd be happy to go into more depth in any of the techniques mentioned or unmentioned, so feel free to post a question in the comments below!A note on the Navigation. The building is also a NavMesh, since they will be dynamically added. Currently NavMeshes apparently can push each other around. This is a bug I am going to fix, not a strange design choice.
Selection {
The most accurate way to select an object is to trace rays from the camera's mouse position, into world-space and check for collisions with objects. For rectangular selection, the amount of rays needed increase dramatically. Since I want this system to be able to run on mobile platforms, I needed a faster method.First thing that came to mind is unprojecting the unit's position from world-space to screen-space. Then simply checking whether the new point was within my rectangle would determine if it is selected. This only works for the single point of the unit's pivot, meaning my rectangle could intersect with most of the model without selecting it. So I simply added a radius and made it a circle. The circle is then tested for intersection with the selection rectangle and more accurate, if still approximate, selection is determined.
There are a few shortcomings with my system, however. Firstly, circles by no means accurately express all models' shapes. Also, my method [currently] doesn't take into account perspective. That is, the circles don't scale with distance from the camera. I have a solution to this but I am unsure if it is necessary or fast enough to be worth it, since my RTS camera may not create much perspective anyways. I'll just save that for another update.
}
R-Tree {
And for those interested in some technical background, here's a video demonstrating the current progress of my R-Tree spacial data structure.This will be used to sub-group units and items into proximity based bounding rectangles (R for Rectangle). The R-Tree will allow for fast look-up of units based on position. So, for instance, when calculating precise line-of-sight, I only want to check units close to a given unit for efficiency. This allows me to quickly obtain these units.
I am not quite happy with the amount of overlap in the tree at the moment, so I will be working to minimize overlap and area of rectangle groups when I integrate it into the Grid system.
}
-K
Tuesday, September 18, 2012
Unity Grid WIP {
Labels:
C#,
Game,
Programming,
Unity
Here's something recent I've been working on for a bit of fun. It's a grid system with fog of war for Unity3D. It is in its early stages at the moment, but it gives you a decent idea how some of the back-end works.
Here it is with a high cell size and a high resolution fog of war texture (for clarity of grid).
Sphere is a Unit, the big cube is a Building, and the other cubes are discoverable objects or set models that respect fog of war.
The grid is scale-able in both size (maintains cell size) and cell size (maintains size). Unity sight range and radii are based on cell sizes so they scale with cell size.
This grid will support any mesh for terrain, not just flat planes. It can also support a very high amount of cells per grid, as it is not instantiating an entire GameObject per cell. The grid lines are a simple projector, scaled to correct size, and with repeating texture.
I don't have pathing done, which will enable the unit to navigate from point A to point B by itself. So for now it just follows the mouse, at the collision point between the mouse ray and the ground.
Fog of war is computed on a per-cell basis, and upscaled to a higher resolution texture to avoid interpolation problems. In the ground shader, I simply multiply in the fog-of-war texture. In each object's shader, I check it's cell's visibility, and multiply by the appropriate tint. Simple.
I could go on and on, but I hope someone else finds this stuff interesting! I'll follow up with progress as I would like to release this for other Unity users.
-K
Friday, September 7, 2012
Soft Feet + {
Labels:
Deformer,
Maya,
nCloth,
Rigging,
Simulation
I did a little more work on the Beast's Soft Feet and thought I'd post the result. The goal was to make the nail extending and retracting more true to a realistic cat paw.
This was my reference for the nail pivot:

The nail pivot was a simple matter of adding a bone or 2 to the end of the nail to use to pivot the nail. The trick was getting the skin to wrap around the nail as it extends and retracts. For this I decided nCloth was the best bet to get a realistic effect.
Comment below to ask questions or give feedback! Hope this helps!
-K
- The model needed to be changed to adapt to the improved rig.
- The nail needed to pivot around the toe joint accurately.
- The surrounding skin needed to react to the nail.
This was my reference for the nail pivot:
The nail pivot was a simple matter of adding a bone or 2 to the end of the nail to use to pivot the nail. The trick was getting the skin to wrap around the nail as it extends and retracts. For this I decided nCloth was the best bet to get a realistic effect.
Skin Cinch {
I didn't want to simulate the entire mesh, since I wanted the skin around the nail to have really accurate collision (high settings). So I created a cinch around the nail. The cinch is an nCloth with dynamic constraints for maintaining transforms and attracting toward the nail. The nail is a passive collider for the skin cinch, so it never penetrates the nail itself. I then use the cinch as an influence on the actual mesh. This avoids simulating the entire mesh and focuses the simulation on the area that matters.Comment below to ask questions or give feedback! Hope this helps!
-K
Wednesday, September 5, 2012
No-Flip Quadruped Foreleg {
Credit to Morgan Loomis for initial leg rigs (Foreleg, Hind leg)
I'd like to share my No-Flip solution to quadruped legs rig. I'll briefly explain the initial leg rigs, but will focus primarily on the No-Flip nature of them. If you want more information on the initial rigs, check out the links above.
As with any IK solver, flipping is a common and troublesome problem. Once the IK handle breaks the IK origin's plane, the knee flips around. This is almost never a desirable effect. So here's my No-Flip solution.


Start with a joint chain on the XY or ZY plane. This will be the main joint chain.

Duplicate the joint chain, rename to "02"s, and remove "wrist_02_jt". Add an IK RP solver from "shoulder_02_jt" to "foot_02_jt" (kneeIK). Create a locator called "knee_PV" and use it as a poleVectorConstraint with "knee_IK". This will be our driver IK.


Add another RP IK from "shoulder_01_jt" to "wrist_01_jt" and name it "ankle_IK". Group it, place the group as a child of "elbow_02_jt", and snap-drag its pivot (hold d+v) to "foot_01_jt". This allows the wrist to pivot by rotating the "pivotAnkle_grp", while keeping it aligned with the forearm! This is the main genius behind Morgan's rig.


Now let's include the foot and toe. Create a SC IK from "wrist_01_jt" to "foot_01_jt" and name it "foot_IK". Now create another SC IK from "foot_01_jt" to "toe_01_jt" and name it "toe_IK".
Let's make a control handle. Create a NURBSCircle, name it "foot_ctrl", and snap it (hold v) to "foot_01_jt". Place all the other IKs under it ("knee_IK", "foot_IK", "toe_IK").
We have now completed the Foreleg rig by Morgan! Now let's make it No-Flip!


Create a 2-length joint chain and snap-drag (hold v) it to start at "shoulder_01_jt" and extend to "foot_01_jt". Add a RP IK to it and name it "helper_IK". Now move "helper_02_jt" up until it is half-way up the leg. Since we made the IK first, movement of the joint will be constrained by the IK for us! This joint chain will be used to keep our "knee_PV" in line with the knee at all times.


Create a locator named "helper_PV", snap-drag (hold v) it to "helper_02_jt", and translate it in Z (if your joints are on the XY plane like mine). Now poleVector constrain "helper_IK" with it. This will keep our helper joint chain from flipping, and thus our knee. (To see what I mean, disable this constraint after the last step).


We need the "helper_PV" to stay between the shoulder and foot, and always on the same side of them. So to avoid getting rotations, we'll use a pointConstraint. Group "helper_PV", select "shoulder_01_jt", shift-select "foot_01_jt", shift-select "helper_PV_grp", and Constrain->PointConstraint.
Now that our helper joint chain won't flip, we can use it to drive the knee PV. Group "knee_PV", select "helper_01_jt", shift-select "knee_PV_grp", and Constrain->ParentConstraint. The group allows for animation of "knee_PV" after the constraint.
That's it! Give it a trial test to see exactly what this rig gives you in comparison to a normal IK setup. It should not flip in the XY plane at all! This should give your characters much more freedom of movement forwards and backwards. And it automates the PV's, so no need to animate PV's every step!
I hope this helps with your quadruped rigs! Thanks again to Morgan Loomis for allowing me to use his awesome foreleg rig! I will be posting a No-Flip solution to his hindleg quadruped rig soon!
Feel free to comment if anything is unclear! I'd love to hear some feedback!
-K
I'd like to share my No-Flip solution to quadruped legs rig. I'll briefly explain the initial leg rigs, but will focus primarily on the No-Flip nature of them. If you want more information on the initial rigs, check out the links above.
As with any IK solver, flipping is a common and troublesome problem. Once the IK handle breaks the IK origin's plane, the knee flips around. This is almost never a desirable effect. So here's my No-Flip solution.
No-Flip Tutorial {


Start with a joint chain on the XY or ZY plane. This will be the main joint chain.


Duplicate the joint chain, rename to "02"s, and remove "wrist_02_jt". Add an IK RP solver from "shoulder_02_jt" to "foot_02_jt" (kneeIK). Create a locator called "knee_PV" and use it as a poleVectorConstraint with "knee_IK". This will be our driver IK.


Add another RP IK from "shoulder_01_jt" to "wrist_01_jt" and name it "ankle_IK". Group it, place the group as a child of "elbow_02_jt", and snap-drag its pivot (hold d+v) to "foot_01_jt". This allows the wrist to pivot by rotating the "pivotAnkle_grp", while keeping it aligned with the forearm! This is the main genius behind Morgan's rig.


Now let's include the foot and toe. Create a SC IK from "wrist_01_jt" to "foot_01_jt" and name it "foot_IK". Now create another SC IK from "foot_01_jt" to "toe_01_jt" and name it "toe_IK".
Let's make a control handle. Create a NURBSCircle, name it "foot_ctrl", and snap it (hold v) to "foot_01_jt". Place all the other IKs under it ("knee_IK", "foot_IK", "toe_IK").
We have now completed the Foreleg rig by Morgan! Now let's make it No-Flip!


Create a 2-length joint chain and snap-drag (hold v) it to start at "shoulder_01_jt" and extend to "foot_01_jt". Add a RP IK to it and name it "helper_IK". Now move "helper_02_jt" up until it is half-way up the leg. Since we made the IK first, movement of the joint will be constrained by the IK for us! This joint chain will be used to keep our "knee_PV" in line with the knee at all times.


Create a locator named "helper_PV", snap-drag (hold v) it to "helper_02_jt", and translate it in Z (if your joints are on the XY plane like mine). Now poleVector constrain "helper_IK" with it. This will keep our helper joint chain from flipping, and thus our knee. (To see what I mean, disable this constraint after the last step).


We need the "helper_PV" to stay between the shoulder and foot, and always on the same side of them. So to avoid getting rotations, we'll use a pointConstraint. Group "helper_PV", select "shoulder_01_jt", shift-select "foot_01_jt", shift-select "helper_PV_grp", and Constrain->PointConstraint.
Now that our helper joint chain won't flip, we can use it to drive the knee PV. Group "knee_PV", select "helper_01_jt", shift-select "knee_PV_grp", and Constrain->ParentConstraint. The group allows for animation of "knee_PV" after the constraint.
That's it! Give it a trial test to see exactly what this rig gives you in comparison to a normal IK setup. It should not flip in the XY plane at all! This should give your characters much more freedom of movement forwards and backwards. And it automates the PV's, so no need to animate PV's every step!
I hope this helps with your quadruped rigs! Thanks again to Morgan Loomis for allowing me to use his awesome foreleg rig! I will be posting a No-Flip solution to his hindleg quadruped rig soon!
Feel free to comment if anything is unclear! I'd love to hear some feedback!
-K
Wednesday, August 1, 2012
"kmFeatherConstraint" MEL Script {
Labels:
Maya,
MEL,
Programming,
Rigging
Here's a little MEL script I wrote a while back. It creates a series of constraints down a chain of items with a falloff. A simple GUI allows for changing of ordering and falloff ease modes ( Linear, Ease-In, Ease-Out, Ease-In-Out ). Eased modes use S-curve interpolation for a nice smooth gradient.
There's a few things I'd like to add to make this better, but I thought I'd throw up version 1 and see if it's useful to anyone.
Here's a video demonstrating its use:
Download kmFeatherConstraint
There's a few things I'd like to add to make this better, but I thought I'd throw up version 1 and see if it's useful to anyone.
Here's a video demonstrating its use:
Download kmFeatherConstraint
"kmCurveBtwnPts" MEL Script {
Labels:
Maya,
MEL,
Programming,
Rigging
I present a very simple, clean, and useful MEL script that does exactly what the name implies. Given a selection of objects, the script creates a NURBS curve that intersects with each point in the order they were selected. Additionally, the curve is constrained to the selected objects, so it will always go through every point.
This can be useful for a multitude of practical rigging setups, as well as just to add some simple flair to improve the visual interface for a rig. I'm excited to have this in my back pocket!
Here's a video demonstrating its use:
Download kmCurveBtwnPts
After much trial and error, I was able to find a simple and clean way to constrain Edit Points of a NURBS curve, so the curve follows through the control points. Edit Points (EP) are much less accessible than Control Points (CP), as moving any given EP has a much greater influence on the curve than a CP. In data they are just read-only vectors. But it looks much nicer to have the curve actually go through your control point, rather than just be influenced by it.
I used two useful tricks here that I'd like to highlight:
- MEL command "eval()" interprets a given string as a command and executes that command. This allows me to iterative-ly compile my curve command, since a single curve command requires all the points to be known. Once I loop through objects, obtain my points, and add it to my command string, I can use "eval( $curveCommand )" to run it!
- "pointCurveConstraint" is a very useful constraint that cleanly constrains a curve to an object. Constraining EPs is not possible, constraining CPs or clusters of them doesn't work either, and binding the curve to joints (my first approach) produces non-smooth and undesirable results. This solved all my problems!
-K
Tuesday, July 17, 2012
"Gauntlet" {
Labels:
Game,
Maya,
MEL,
Programming,
Rigging,
Short Film,
Simulation
An old woodsman possesses an ancient gauntlet with the power to summon armor and weapons at will. This weapon is put to the test as he discovers that his gauntlet is not the only ancient magic in these woods.
Created by Jeff Belgum, Katlan Merrill, and Ben Smith Sound design by Jesse Rope Score by Anthony Ferraro and Zach Johnston
Finally it's done! Here is my thesis short film, entitled "Gauntlet". I had the pleasure of working with two other talented friends of mine, Jeff Belgum and Ben Smith. We all put a couple years of our lives into this project, and many late nights. We wanted to push the envelope of student films with stunning visuals and a dynamic action sequence. Even if we produced nothing, it would have been worth the first-hand knowledge of going through the process of making an animated film from start to finish.
Role {
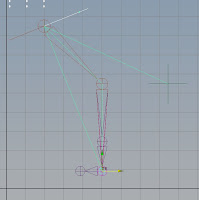
My roles in the creation of this film were primarily in the pre-production section. I was the Lead Designer, Lead Modeler, and Lead Rigger, so I designed, modeled, and rigged the two characters, the "Hero" and the "Beast", in addition to helping with story, layout, simulations, hair, rendering, and animating. I also managed and automated parts of the pipeline to speed up workflow with MEL scripts, vrscene files, and program integration.Beast {

The Beast proved to be the most complex and time-consuming rig. I got a bit creative with the control scheme, which made my rig unique and intuitive. The back controls are all exposed well above the actual model, allowing the animator to always select them from any camera angle. The custom control spline shapes were created in Illustrator, and each describe the action they perform. My goal with the rigs was to create the most automated, easily animated rigs possible, while maintaining a good amount of control. This led me to the decision, for example, to make the tail fully simulated, requiring no animation at all to look smooth and realistic.
I created my own muscle system for deformation at particular joints, like the shoulders, hips, and biceps. I had experimented with maya muscle, and due to the buggy and uncontrollable nature of them, decided to make my own. It is a simple system, taking 2 points as attachments, and based on the distance between them, bulges or stretches the NURB muscle object using user-created SDKs. Complete with a basic MEL interface, I was able to get decent deformation at all points with full customization and no bugs.
Hero {

Please comment if you'd like me to break down any part of the pipeline! I'd love to hear your input and questions!
-K
Tuesday, June 26, 2012
Crabs and Penguins Launches {
Labels:
Announcements,
C#,
CG,
Game,
Programming,
Shader,
Unity

Finally the day has come! "Crabs and Penguins", a game I worked on this last year for Coca Cola, is finally available on the AppStore for iPad and iPhone. It will be releasing for Android, PC and Mac standalone soon. We also made a cinematic commercial of the story behind the game. Be sure to check it out at the website link below!
As lead programmer at Ember Lab, I was tasked with the game programming for the main 6 levels. This includes the player controls, player movement, collectibles and power-ups, graphics and shaders, level block-ins, and game-play testing. The primary development tools were Unity3D game engine with C# programming language. I also used some CG and ShaderLab for shader programming, as seen in my Water Shader post.
 |
| Screenshot of "Crabs and Penguins" |
Here's the link to the Download, the Website, and the Facebook Page.
If you have any feedback, comments, or questions on how anything was done for the game, please comment below! I'd love to do a tutorial or explanation on how we made this game. Try to be specific so I can give you a detailed answer.
"Leave a crab. Return a hero."
-K
Monday, June 25, 2012
Soft Feet {
Labels:
Deformer,
Maya,
nCloth,
Rigging,
Simulation

I'm currently working on adding details to a quadruped rig from my senior thesis film "Gauntlet". I didn't get as much time as I wanted rigging him, so I decided I'd enhance a few parts. One part that bothered me about this character was his feet's interaction with the ground. So I set out to fix it by adding deformation to the foot to simulate the pads squishing on the ground. The animator can get the foot relatively realistic and with minimal clipping, but having a touch of deformation sells the impact.
The simple approach would have been to just create some NURB deformers and give the animator control of the squash and stretch of the foot. However this would add even more work to the poor animator who is tasked with a walk cycle of a quadruped. So I decided an automated/simulated solution was ideal in this scenario.
Now I needed to avoid the messiness and expense of making the entire body into an nCloth. The body mesh is quite high poly, and I only wanted to simulate the feet. Thus, I decided to only simulate the pads of the foot and use those as influences on the main mesh. The pads are extremely low poly, so they simulate almost real-time. And they also more correctly describe the foot of a lion (my inspiration for the feet). The one trick here is to make sure you check on "Use Components" in the skinCluster of the main mesh being influenced. This means it will use the components of the influence object and not just its transform.
Here is a quick video showing the deformation effect:
And here's one on a more bumpy surface (it is simulated after all):
So, to replicate, follow these steps:
Wednesday, June 20, 2012
Water Shader {
Labels:
CG,
Programming,
Shader,
Unity

Features:
- Efficient shader optimized for mobile devices
- Realtime refraction of anything on opposite side of water plane
- Sin blend between 2 normal maps for smooth normal animation
- UV Panning normal maps
- Reflection Cubemap
- Renders in Opaque queue with no expensive transparency cost
- Separate settings for fog over and under water
- Separate settings for far clip planes over and under water (quality)
- Controls for Transparency, RefractionFactor, ReflectionFactor, RenderTextureSize, Tiling, FogSettings, etc
Here's some more screenshots and a video: (Sorry for bad quality)


And here's the relevent vertex and surface shaders (in CG):
Tuesday, June 19, 2012
So It Begins {
Labels:
Announcements
Today the blog begins! I will be posting cool tricks and interesting solutions on both Programming and Rigging topics as I learn them. I hope to use this blog as an informative and helpful resource to others in my field, and as a sample of my work.
I also reserve the right to stray a little from Rigging and Programming to show some of my work in Modelling, Rendering, Simulation and FX, and other 3D Art.
So please check back often! Hope you enjoy it!
I also reserve the right to stray a little from Rigging and Programming to show some of my work in Modelling, Rendering, Simulation and FX, and other 3D Art.
So please check back often! Hope you enjoy it!
-K
Subscribe to:
Posts (Atom)