Link to No-Flip Foreleg post
As before, I'd like to share my No-Flip solution to quadruped legs rig. This time, I'll be doing the hind-leg, as promised. I'll briefly explain the initial leg rigs, but will focus primarily on the No-Flip nature of them. If you want more information on the initial rigs, check out the links above.
The Hind-Leg solution utilizes the same techniques as the Foreleg, but the extra ankle joint gives us some more work to do.
Tutorial {


Start with a joint chain on the XY or ZY plane. This will be the main joint chain. For simplicity, I left out the toe joint, but it shouldn't be difficult to add it if you wish.


Create a null (ctrl-g), snap its position (hold-v) to "hip_01_jt", and Freeze Transforms. Name this group "spring_jt_grp". Parent "hip_02_jt" under this group. Now do the same thing for "hip_01_jt" but name this group "main_jt_grp".
Create a NURBSCircle, name it "Hip_ctrl", and snap it (hold v) to "hip_01_jt". Freeze its transforms. Point constrain the "spring_jt_grp" to the "Hip_ctrl". This avoids rotating the ikSpringSolver, which causes flipping issues later. Parent constrain the "main_jt_grp" to the "hip_02_jt". This gives our main joint the rotation from the spring joint's hip. Now we are able to move the entire hip via the "Hip_ctrl".


Create a NURBSCircle called "Foot_ctrl". Snap its position to the foot and freeze its transforms. Parent all three iks under it. Now we have a foot we can move around!


Create a null, name it "pv_grp", snap its position to "helper_02_jt", and freeze its transforms. Parent under it "knee_pv" and "ankle_pv". Now parent that entire group under "helper_01_jt".
Try moving the "Foot_ctrl". As you can see, the PVs move with our leg now. But we still have some odd twisting action happening, as seen in the viewport image above. This is because the "helper_pv" is not moving with our leg as it should. It needs to stay evenly between the Hip and the Foot in order to serve its purpose. Let's solve that next.
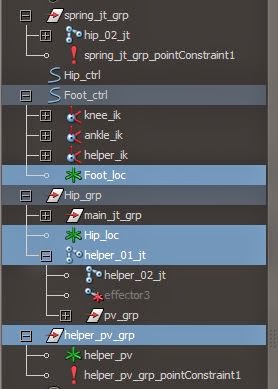

Now in order to keep it between our Hip and Foot, let's simply create a shared pointConstraint. First Create a locator called "Foot_loc", snap it to our Foot, and parent it under our "Foot_ctrl". Do the same with the hip, naming and positioning it accordingly. Then select "Foot_loc", shift select "Hip_loc", and then shift select "helper_pv_grp". Create a pointConstraint. Now our helper_pv will stay where it should.
Try moving our "Foot_ctrl" around to see the improvement. The leg should stay facing the Z axis, with no twisting action at all.
This is the basic finished rig, but as you can see, it's a bit messy and unusable as it is now. Next let's clean it up and add one more nifty control for our animators.


Now all we want to do is connect our hip control's rotation X to our hip joint's Z rotation. We also need to multiply by negative 1 in order to flip it. Simple enough.
Select "Hip_ctrl" and "hip_01_jt". Then enter the Node Graph and press the
 button to add them to the view. Press "Tab" and start typing "multiplyDivide" to create a multiplyDivide node. Now connect "Hip_ctrl" Rotate and connect it to the Input of "mulitplyDivide1". It will create a unitConversion node, which you can ignore. Next connect the outputX of multiplyDivide1 and connect it to RotateZ of "hip_01_jt". Now select "multiplyDivide1", and in the ChannelBox, set "Input2x", "Input2y", and "Input2z" to -1. This will invert our value before sending it to our joint.
Now try it out! Rotate "Hip_ctrl" along the axis of the knee. You should see it change the pitch of the leg. This is a great control for our animators to use.
Note: If the nothing happens, try connecting from our hip's rotateZ instead of rotateX. It depends on how your hip control is rotated relative to your joint.


Alright! Now for some simple cleanup.
Create 3 nulls named "rot_grp", "dont_rot_grp", and "HindLeg_rig". Snap all 3 to the hip and freeze their positions. Place everything on the root of the heirarchy EXCEPT "spring_jt_grp" into "rot_grp". Place "spring_jt_grp" into "dont_rot_grp". This is the entire reason we went through all the trouble of separating our spring joint heirarchy. Rotating it causes odd issues.
Now create a giant NURBSCircle named "Main_ctrl". This is effectively your character movement control. Parent constrain "rot_grp" to "Main_ctrl".
Select everything you don't want to see and add it to a layer called "hidden". Set visible to False.
Aaand we're done! Give it a trial test to see exactly what this rig gives you in comparison to a normal IK setup. It should not flip in the XY plane at all! This should give your characters much more freedom of movement forwards and backwards. And it automates the PV's, so no need to animate PV's every step!
Feel free to comment if anything is unclear! I'm sure I glossed over a few minor details in an effort to shorten the tutorial. I'd love to hear some feedback!
Thanks Katlan, this has helped me so much with a hare rig i'm creating atm, I'll be sure to credit u when i post it online, keep up the great work!
ReplyDeleteHey Alex, glad I could help! I'd love to see your rig when its done! And thanks for the credit :)
DeleteHey Katlan, I have found a slight problem. I have parented the leg under a root group to control the entire rig but it has caused a double transform for the IK thigh when you rotate the root group in Y, any ideas why this might happen?
DeleteHey alex. Yes this is an oddity of using the SpringSolver. You must keep the spring_jt_grp outside of the root control. Otherwise it will double-transform. As you can see in the video, I was able to do this, and still have the leg be transformed by the root control properly.
DeleteMaybe I'll just post the entire MB file so you can see the details and compare it with my result. Let me know if that will help.
Very helpful, thank you.
ReplyDeleteAwesome :)
DeleteThanks Katlan! Very nice tutorial!
ReplyDeleteKatlan, Thank you so much for the step by step, I was having difficulty breaking down the loomis setup. Im working on a python script to automate the setup.
ReplyDeleteHey Rob, glad it's helping you! I'd love to see your automated version of this, and agree that's the next improvement to make here. If you need help scripting let me know. And please shoot me a link when you're done!
DeleteKatlan...this was a great tutorial. It went into more detail than Morgan Loomis' so was greatly appreciated. I see where you said not to parent the spring solver under the root control. What about the original joint chain? Can it still be parented to the pelvis joint? Thanks again.
ReplyDeleteThanks, glad you liked it! Yes, the separation of the rig allows for most of the rig to be parented, just not the spring joint, as that needs to inherit no rotation transforms.
Delete